PCB Design Simplified Choosing the Best Copper Thickness

You need to pick the right copper thickness for your PCB. Think about how much current your board will carry. Also, consider how much heat it needs to handle. Manufacturers set limits for copper thickness. Most PCBs use 1 oz copper. You may need 0.5 oz for fine-pitch layers. You may need up to 3 oz for high-current designs. The table below shows common copper thickness options. It also shows where you might use them:
Copper Thickness | Application Description |
|---|---|
0.5 oz (17 µm) | Fine-pitch inner layers in multilayer PCBs |
1 oz (35 µm) | Industry standard for most PCBs |
2 oz (70 µm) | Power electronics, automotive, industrial boards |
3 oz (105 µm) | Heavy copper PCBs for high-current designs |
Picking the right thickness helps your board carry more current. It also helps your board get rid of heat. It makes your board stronger. You will learn easy steps for Copper Thickness Selection in pcb design.
Key Takeaways
Pick copper thickness by how much current you need. Use 1 oz for most PCBs. Use 2 oz for high-power jobs. Use 0.5 oz for layers with small parts.
Thicker copper helps get rid of heat. It stops the PCB from getting too hot. This makes your PCB last longer.
Try to balance how well it works and how easy it is to make. Thicker copper makes the PCB stronger. But it can make the design harder and cost more.
Talk to your manufacturer early. Make sure they can make the copper thickness you want. Check if they can do the trace widths you need.
Watch out for common mistakes. Do not use thick copper for inside layers. Do not forget what your manufacturer can do. These mistakes can cost a lot to fix.
Why Copper Thickness Matters
Current Carrying Capacity
You need to choose the right copper thickness for your pcb because it controls how much current your board can handle. If you use thin copper, your traces may overheat and fail. Thicker copper lets you run more current safely. According to IPC-2221 standards, you can see how copper thickness changes the current carrying capacity:
Copper Thickness | Width | Current Capacity | Temperature Rise |
|---|---|---|---|
1 oz | 5 mm | ~20 A | 10°C |
2 oz | 5 mm | ~28 A | 10°C |
You can use 0.5 oz copper for low-power circuits. For high-power designs, you may need 2 oz or even 4 oz copper to prevent overheating. Thicker copper traces support higher currents without getting too hot. This helps your pcb work well and last longer.
Heat Dissipation
Copper thickness also affects thermal management. Thicker copper lowers thermal resistance. This means heat spreads out better across your pcb. If you increase copper thickness from 1 oz to 2 oz, you can lower the temperature rise from 50°C to about 30-35°C in high-power circuits. Good thermal management keeps your board safe from hot spots and reduces the risk of failure. Most standard pcbs have thermal conductivity values from 0.2 to 0.4 W/m-K. Metal-core pcbs can reach up to 4 W/m-K, which helps even more with heat.
Trace Width and Spacing
Copper thickness changes how you design trace width and spacing. Thicker copper lets you use narrower traces for the same current, which can save space. However, it also means you need to watch out for minimum trace width and spacing limits. For example:
Copper Thickness | Minimum Trace Width | Minimum Spacing |
|---|---|---|
1 oz/ft² | 3-4 mils (76-102 μm) | 3-4 mils (76-102 μm) |
2 oz/ft² | 5-6 mils (127-152 μm) | 5-6 mils (127-152 μm) |
If you use thick copper, it can be harder to make fine features. It may also cost more. Always balance copper thickness with your pcb design needs for the best results.
Copper Thickness Units Explained
Ounces, Mils, and Micrometers
You will see copper thickness described in three main units: ounces (oz), mils, and micrometers (µm). Each unit gives you a different way to measure how thick the copper layer is on your PCB.
Ounces (oz): This unit tells you how much copper covers one square foot of the board. For example, 1 oz means one ounce of copper spread over one square foot.
Mils: One mil equals one-thousandth of an inch (0.001"). This unit helps you see very small thicknesses.
Micrometers (µm): This metric unit is common in PCB manufacturing. One micrometer is one-millionth of a meter.
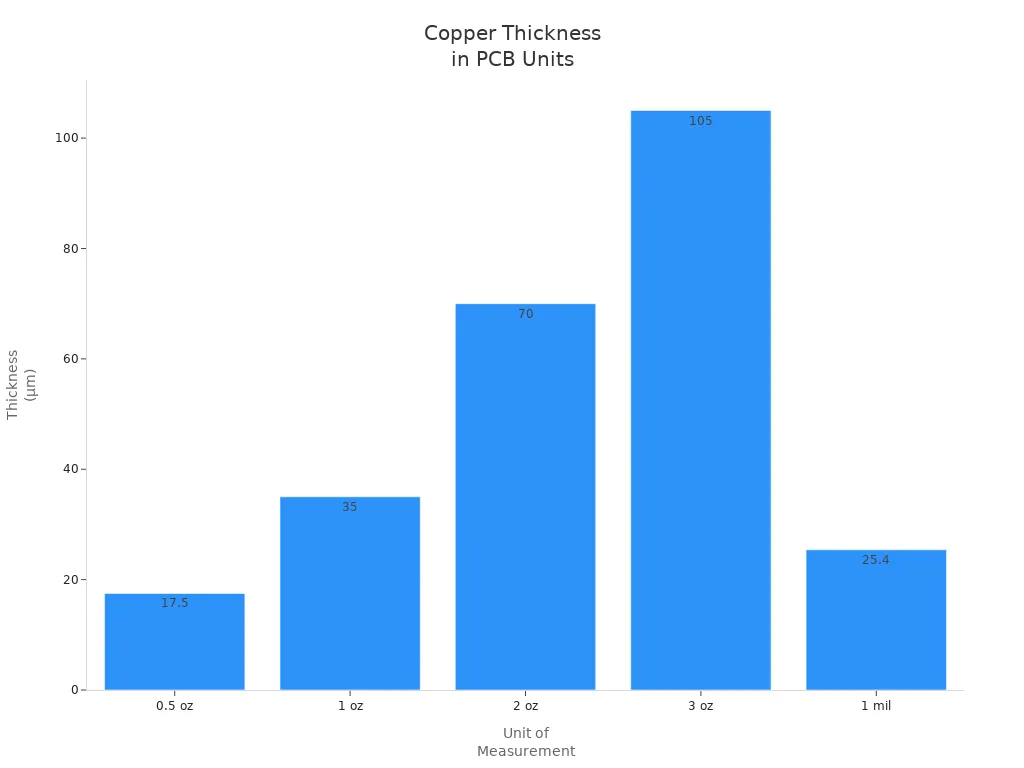
You can check the table below to compare these units for standard copper thicknesses:
Unit of Measurement | Micrometers (µm) | Millimeters (mm) | Inches |
|---|---|---|---|
0.5 oz | 17.5 µm | 0.0175 mm | 0.0007” |
1 oz | 35 µm | 0.035 mm | 0.0014” |
2 oz | 70 µm | 0.070 mm | 0.0028” |
3 oz | 105 µm | 0.105 mm | 0.0041” |
1 mil | 25.4 µm | N/A | N/A |
💡 Tip: Most PCBs use 1 oz copper, which is about 35 µm thick. Some boards use 18 µm copper for fine features.
Converting Units
You may need to convert between ounces, mils, and micrometers when you read datasheets or talk to manufacturers. Here are some quick facts:
1 oz/ft² of copper equals about 1.37 mils or 35 µm thick.
1 mil equals 25.4 µm.
0.5 oz copper is about 17.5 µm thick.
Unit Type | Measurement |
|---|---|
Mils | 1 oz/ft² = 1.37 mils |
Ounces per Square Foot (oz/ft²) | 1 oz/ft² = 1 ounce over 1 ft² |
Micrometers (μm) | 1 oz/ft² = ~35 μm |
You can use these numbers to check if your design meets the needs of your project. Knowing how to switch between units helps you talk clearly with your PCB supplier.
Copper Thickness Selection Factors
Application and Current Needs
When you pick copper thickness, think about what your pcb does. Some boards control small sensors. Others give power to motors or LED drivers. You need to know how much current goes through each trace. Use the IPC-2221 Trace Width Calculator to check the highest current. Circuits with lots of power need thicker copper so they do not get too hot.
Here are the main things you should think about:
How much current each trace carries
How much heat is made and how it leaves the board
How wide traces are and how much space you have
How strong and reliable the board must be
What rules and environment the board must handle
You can use these steps to pick copper thickness:
Find out how much current and power your pcb needs.
Check if you need more copper for heat in high-power circuits.
Think about how strong the board must be and where it will be used. Boards for cars or factories often need more copper.
If your design is complex, you may need thinner copper for small parts.
Talk to your manufacturer early. Ask what copper thickness and trace width they can make.
💡 Tip: Most signal layers use 1 oz copper. Use 2 oz copper for power traces that carry over 3A. For high-current boards, run a simulation to check if your copper thickness is enough.
PCB Layer Structure
Copper thickness depends on your pcb’s layer structure. Multilayer boards have inside and outside layers. Inside layers can use thinner copper for small features. Outside layers often need thicker copper for power and ground.
Copper Thickness (oz) | Minimum Finished Thickness (mils) | Application Requirements |
|---|---|---|
1 oz | 0.9 | Most signal layers |
2 oz | 1.2 | Power traces exceeding 3A |
3 oz and above | Varies | High-current applications |
You should write down copper thickness in your fab drawings. This helps your manufacturer know what you need. Remember, etchback makes the finished copper a bit thinner. For high-speed pcb design, thin copper helps control impedance better. This makes signals clearer in RF and telecom boards. Thick copper gives better grounding and shielding. This lowers electromagnetic interference and makes the board more reliable.
📝 Note: Thin copper is good for high-frequency circuits. You can get a steady 50-ohm impedance with a 0.5 oz layer. Thick copper is best for power and ground planes.
Performance vs. Manufacturability
Copper thickness changes how well your pcb works and how easy it is to make. Your board must carry enough current and get rid of heat. It also needs to be simple to build and not cost too much.
Thick copper lets your board carry more current and last longer.
It helps spread heat in high-power circuits.
It makes the board stronger and more reliable.
But thick copper makes it hard to make small traces and spaces. It also costs more to make. You need to find a good balance between performance and how easy it is to build.
Copper Thickness | Typical Use Cases | Manufacturability Impact |
|---|---|---|
1 oz | Standard signal layers | Easy to fabricate |
2 oz | Power traces, industrial boards | Moderate complexity |
3 oz+ | High-current, heavy-duty applications | Higher cost, limited fine features |
You should talk to your manufacturer before you decide on copper thickness. Ask if they can make your trace width and spacing. Think about the environment, like recycling copper and using safe etching. Pick materials and finishes that are better for the planet when you can.
⚠️ Always balance copper thickness with your pcb goals. Too much copper costs more and is harder to make. Too little copper can cause overheating and failure.
Common Mistakes in Copper Thickness Selection
Over- or Under-Specifying
Some people think the thickest copper is always best. This is not true for every pcb. If you pick copper that is too thick, your board costs more and is harder to make. If you choose copper that is too thin, your board can get too hot or break. Here are mistakes you should not make:
Putting high-current traces on inner layers. Inner layers do not carry as much current as outer layers. They cannot get rid of heat as well.
Not thinking about copper roughness in high-frequency designs. Rough copper can make signals weaker in fast circuits.
Thinking all "2 oz" copper is the same. Different factories use different ways to make copper. This can change how strong and good your board is.
If you use too little copper, your board can get too hot. It can also be weak or have broken traces. If you use too much copper, it is hard to make small details. The board can also bend during lamination.
⚠️ Always pick copper thickness that matches your current needs and design goals. This helps your pcb last longer and work better.
Ignoring Manufacturer Limits
You need to know what your factory can do before you pick copper thickness. Not every factory can make every thickness or trace width. If you do not check, you may have delays or pay more. The table below shows common choices for different pcb types:
PCB Type | Common Copper Thickness Options | Considerations for Selection |
|---|---|---|
Single-Sided PCBs | 1 oz (35 μm), 2 oz (70 μm) | Use thicker copper for higher current. |
Double-Sided PCBs | 1 oz (35 μm), 2 oz (70 μm), 3 oz (105 μm) | Choose based on complexity and heat needs. |
Multilayer PCBs | 0.5 oz (17 μm) to 2 oz (70 μm) for inner layers; 1 oz (35 μm) to 3 oz (105 μm) for outer layers | Pick based on design and layer specs. |
You should always ask your pcb supplier about their limits for copper thickness, trace width, and spacing. This helps you avoid changing your design later.
Cost Implications
Copper thickness changes how much your pcb costs. Thicker copper costs more to buy and takes more work to make. It also takes longer to etch and can mean you get fewer good boards in each batch. Here is a quick look at how cost changes with copper thickness:
Copper Thickness | Relative Material Cost | Fabrication Cost | Typical Applications |
|---|---|---|---|
1 oz | Lowest | Lowest | Consumer electronics, control boards, signal circuits |
2 oz | Moderate | Higher | Power supplies, LED drivers, automotive electronics |
3 oz | Highest | Highest | Inverters, motor drives, industrial power systems |
2 oz copper boards can cost 15–20% more than 1 oz boards.
Thicker copper makes etching harder and can cause undercutting.
Uneven copper thickness can bend the pcb during lamination.
If you pick the right copper thickness, you save money and get a strong pcb. Always balance your needs for current, heat, and cost.
PCB Design Tips for Copper Thickness
For Beginners
If you are new to pcb design, you should try to avoid mistakes. Here are some easy tips to help your first pcb work well:
Start with a clear schematic. This makes it easier to place parts and draw traces.
Pick design software that lets you set copper thickness and trace width. This helps you match your current needs.
Put power and ground planes on the outside layers. This helps your pcb carry more current and spread heat.
Make traces short and straight. Short traces have less resistance and fewer signal issues.
Check the space between traces. Make sure you have enough room to stop short circuits.
Build and test a prototype. This lets you find heat or build problems before making many boards.
🛠️ Tip: Always check your copper thickness in your design tool before you send files to the manufacturer.
For Experienced Designers
If you already know pcb design, you can use more advanced ideas:
Change copper thickness for each layer based on what you need. This helps you get good performance and strong boards.
Use simulation tools to see how your pcb handles current and heat. Simulations help you fix problems before you build.
Talk with your manufacturer often. Make sure your copper thickness matches what they can make.
You can also solve factory problems early. This makes sure your pcb meets your goals and the factory’s limits.
Consulting Your Manufacturer
You should talk to your pcb manufacturer early in your design. This helps you avoid expensive changes later. Here is what you should do:
Ask if the manufacturer can make your copper thickness, especially for heavy copper pcbs.
Check the thickest copper and smallest trace width they can make.
Tell them about your current needs and trace widths. Use IPC-2221 or IPC-2152 to help with your numbers.
Talk about any special steps needed for thick copper or many layers.
Use prototypes and simulations to test your design before making lots of boards.
📞 Note: Good talks with your manufacturer help you get a pcb that fits your copper thickness, cost, and reliability needs.
You can pick the right copper thickness for your pcb by using a few easy steps. First, figure out how much current and power each trace needs. Next, check if your pcb parts get hot, especially if they use a lot of power. Think about how strong your pcb must be and where it will be used. Choose copper thickness based on how hard your design is and how wide your traces are. Talk to your manufacturer early to make sure they can make what you want.
If you match copper thickness to your project and factory needs, your pcb will work better and cost less. Look at this table to see how different copper thicknesses change your pcb:
Copper Thickness | Cost Impact | Performance Benefits |
|---|---|---|
1oz | Baseline | Standard performance |
2oz | 15-20% more | Improved heat dissipation, more current |
3oz+ | 50% more | Best for thermal management, strong pcb |
Remember these tips for your next pcb project: Try to keep your layers balanced so your board does not bend. Make trace width and cooling good for the current you need. Use 1oz copper for most boards and 2oz for boards that need more power.
If you follow these steps, you can make a pcb that works well and does not cost too much every time.
FAQ
What does copper thickness mean in a pcb?
Copper thickness tells you how thick the copper layer is on your pcb. It affects how much current your board can handle and how well it manages heat.
How do you choose the right copper thickness for your pcb?
You should check how much current your pcb needs to carry. Use standard values like 1 oz for most boards. Pick thicker copper for high-power or industrial designs.
Can you use different copper thicknesses on one pcb?
Yes, you can use different copper thicknesses on inner and outer layers. This helps you balance cost, performance, and space in your pcb design.
Does thicker copper make a pcb stronger?
Thicker copper makes your pcb stronger and helps it last longer. It also improves heat spreading and current carrying ability.
What happens if you pick the wrong copper thickness for your pcb?
If you choose copper that is too thin, your pcb can overheat or fail. If you pick copper that is too thick, your board costs more and may be harder to manufacture.
See Also
Key Strategies for Creating High-Current Copper PCBs
Comprehensive Guide to Heavy Copper Multilayer PCB Production
Utilizing Panasonic Copper-Clad Laminates in PCB Fabrication
Grasping Vertical Continuous Plating for Copper Thickness Precision
Ten Strategies to Reduce Expenses in Custom PCB Manufacturing